Lists
From the left menu, the lists menu includes three sub menus
Lists
includes all the added lists, you can search for any lists using the available search criteria, you can view list’s statistics, copy list, update its info or delete it using the corresponding buttons next to the list. In addition to that you can view all subscribers, hide or show columns in the gird view and create new list.

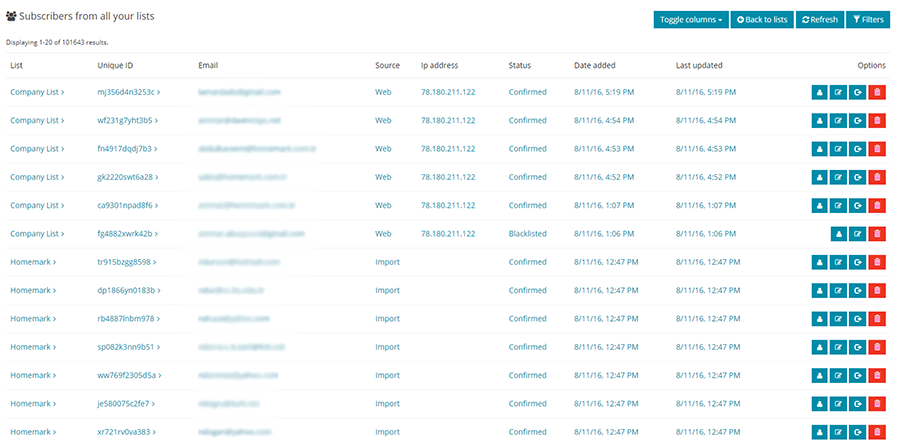
Clicking on ‘All Subscribers’ will take you to another page that displays all the subscribed people and their subscription info, next to each subscriber there’re four buttons for subscriber’s info, update, unsubscribe and delete You can filter those subscribers by clicking on the filter button and use the search criteria
Create New List
For any new list you are creating, you must create the list name before being able to add or upload any contacts (lists) you may have to import. At this stage, you are only concerned about creating the list name and the list criteria, not adding or importing names.
The create window requires you to input relevant data such as General information, Defaults, Notification settings and Company information needed for any campaign.
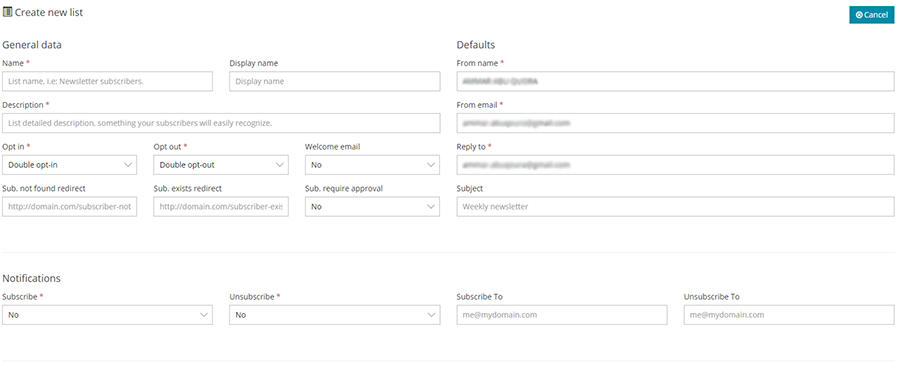
General Data: Name of the list and your display name of the list if you want it different. A summary description of your list. Contact defaults would be those set in your Account Settings. If you wish to change these for a certain list, you would do so here. Opt In or Opt Out type, either single or double. For example, a double opt-in is when a subscriber signs up on your website (first opt-in) and then receives an email to confirm the registration. A single opt-in or opt-out is when someone clicks to register (or unregister) and is immediately opted in or out without receiving an email that must be confirmed.
Notifications: Whether you wish to receive email notifications of each opt-in or opt-out. Keep in mind that you can login to your Dashboard to see the opt-ins and opt-outs.
Company Details: Defaults would be those in your Account Settings. As in the Contact information in the General Data above, the Company Details default to your Company Account Settings. If you wish to change these for a certain list, you would do so here.
Once you have created your list, it will appear in the list window, with the name of the list, display name if you gave it one, Next to each list there’re four buttons, overview, copy, edit and delete. Copy and Delete are self explanatory for the list. The Update icon is to edit any criteria you originally inputted.
List Overview Section
From the overview button, you can view general overview boxes and each is linked to external links that could be very useful for actions like uploading the subscribers’ list, accessing the custom fields, or creating lists segments.

- Subscriber box: you can manage your existing subscribers (create/update/remove) and also you can adjust your list depending on your unsubscribe. For example you can add new custom fields or remove existing.
- Segmentation box: you can segment your list with various criteria based on your custom list fields and on a high number of operators. Segmentation will help you target a specific type of users when sending campaigns.
- Custom Fields box, Pages box and Forms box: are for your website and visitor subscriber areas. You have the ability to create, customize and add these forms to your website for your site visitors to subscribe or unsubscribe. You will not need much web building knowledge to apply these areas.
- List Tools box: is used to import, export and copy your list/subscribers. CSV and Text files will be most applicable to you, while the database box is for more advanced users that do have their own MySQL databases.
Tools
The tools page contains two buttons “Sync Subscribers and Split list”
Clicking on “Sync Subscribers” will open a popup page that contains all the info needed to compare two lists along with some actions to do in case of missing subscribers or duplicated ones.

Clicking on “Split lists” This tool allows you to split a big list into multiple smaller ones. Please note that subscribers from the selected list will be moved into new lists, not copied.

Email Blacklist
This page lists all the blacklisted emails along with their reasons, you can add new blacklisted emails or you can import a list of blacklisted emails, you can also export them or delete any of them.
