A.O.M HR Management
Contents
Clients
Client is a person who employs or retains an attorney to represent him or her in any legal business. Admin can create clients, update / delete existing clients and also can export list of clients. Admin can also create custom fields for clients if needed by Custom Fields section.

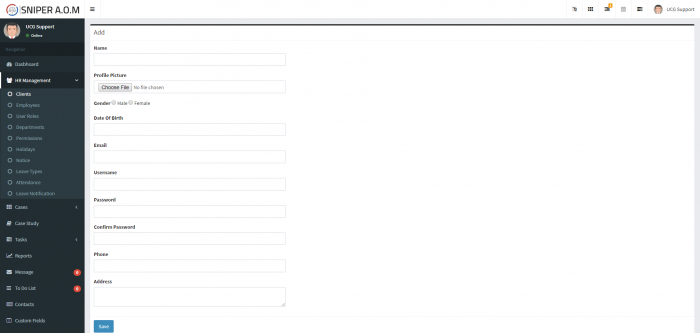
Add Client
To add new client, press on the “Add New” button, fill the fields in the form
- Name - Name of the Client.
- Profile Picture - Picture of Client.
- Gender - Gender of Client.
- Date Of Birth - Date of Birth of Client.
- Email - Email of Client.
- Username - Username of client.
- Password - Personlize Password to login into system.
- Confirm Password - It should be same as Password.
- Phone - Phone number of Client.
- Address - Address of Client.
Then press “Save”
Note: Username and Password will be used to login into the system
When the Client logs in to the system, he will only be able to see his cases and be able to send messages to the admin.
Employees
A person who is hired to provide services to a company on a regular basis in exchange for compensation and who does not provide these services as part of an independent business. Admin can create employees, update / delete existing employees and also can export list of employees. Admin can also create custom fields for employees if needed by Custom Fields section.
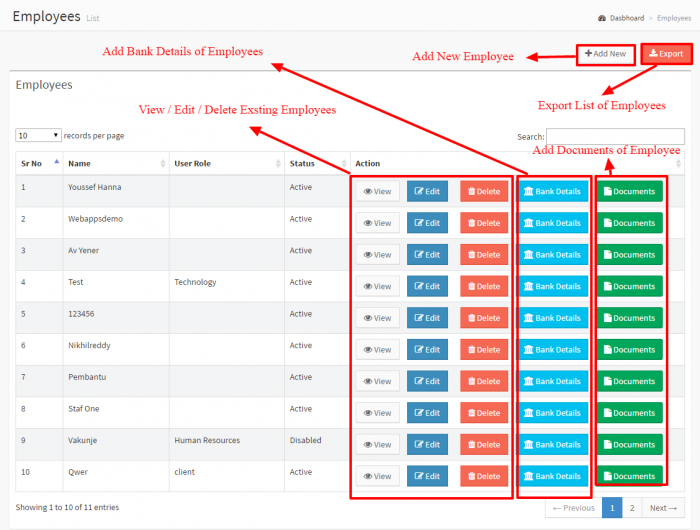
Add Employee
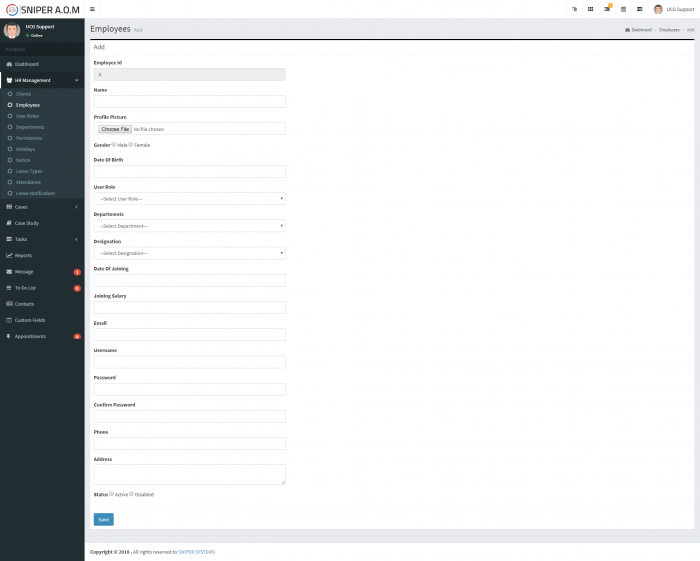
To add an employee, click on the “Add New” button, fill in the employee form
- Name - Name of the Employee.
- Profile Picture - Picture of Employee.
- Gender - Gender of Employee.
- Date Of Birth - Date of Birth of Employee.
- User Role - User Roles of System User which is coming from HR Management -> User Roles.
- Departments - Department (Ex. HR Department, Sales Department) of Employee which is coming from HR Management -> Departments.
- Designation - Designation (Ex. Sales Manager, Database Administrator) of Employee which is coming from HR Management -> Departments.
- Date Of Joining - Date of Joining to Company of Employee.
- Joining Salary - Salary of Employee.
- Email - Email of Employee.
- Username - Username of Employee.
- Password - Personlize Password to login into system.
- Confirm Password - It should be same as Password.
- Phone - Phone number of Employee.
- Address - Address of Employee.
- Status - Set Active if you want to assign tasks otherwise you cannot.
When done click “Save”
Note: Employee ID will be automatically generated which is started by already set in Administrative -> General Settings -> HR Settings
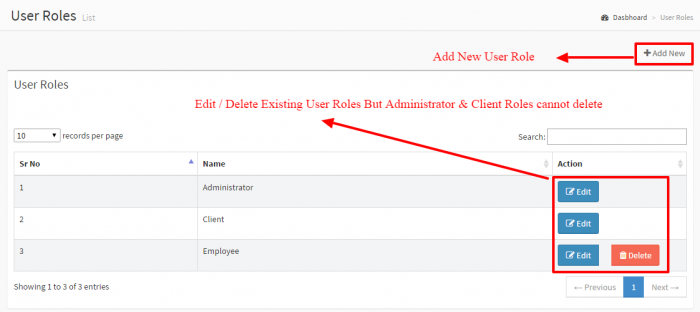
User Roles
In User Roles Section. Admin can create unlimited roles of user and can update / delete existing user roles.
You can add new user role by clicking on the “Add New” button and fill in the User Role Form
- Name - Name of the User Role.
- Description - Description of User Role.
Note: Administrator and Client Roles are fixed not deletable. Roles permission can be set by HR Management -> Permissions.
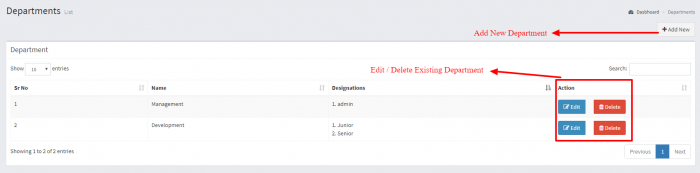
Departments
In Departments Section. Admin can create unlimited department and designations of that department and can update / delete existing departments and their designations.
To add new department, click on the “Add New” button and fill in the department form
- Name - Name of the Department.
- Description - Description of Department.
- Designations - Multiple Designations of Department.
Note: Departments and Designations are used while creating employee.
Permissions
In Permissions Section. Admin is able to set the permission of access of particular modules for system users of particular roles.

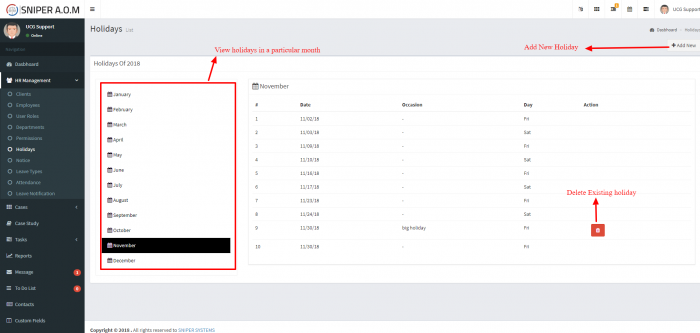
Holidays
Holidays is used to create list of holidays in companies. Admin is able to create unlimited holidays in the year or delete existing holidays.
To add new holiday click on the “add New” button, and fill in the holiday form
- Name - Name of Holiday.
- Date - Date of Holiday.
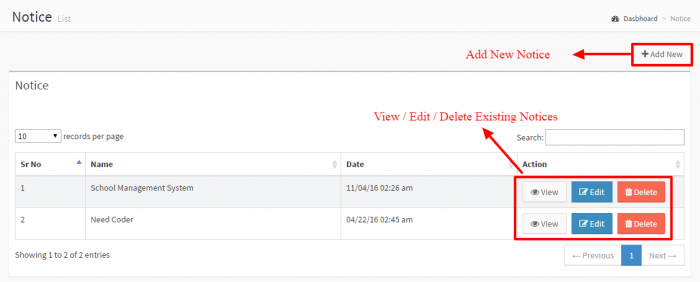
Notices
Notices is used to send any important information to all internal users of system. you can create notice and each user will get the Notice on their dashboard.
To add new notice, click on the “Add new” button, and fill in the notice form
- Title - Title of the Notice.
- Description - Description of Notice.
- Date - Date of Notice.
Note: You can find the latest list of notices on Dashboard.
Leave Types
Leave Type is just use for informational purpose to know which type of leave is applied by employee. Admin can create unlimited leave types and can update /delete existing leave types. Leave type is used by employee panel where employee can apply leave, he needs to select leave type with reason.
To add new leave type, click on the “Add New” button and fill in the leave type form
- Leave Types - Name of the Leave Type.
- Leaves - Number of leaves allowed in the year for this particular leave type.
- Description - Description of Leave Type.
Note: In Leave Notifications Section, you can get the list of applied leave with leave type.

Attendance
Attendance is used to check the attendance report for all employees or specific employee for particular period.

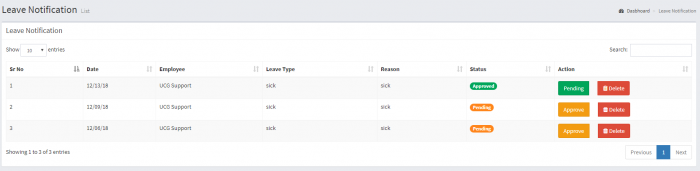
Leave Notification
When any employee applies for a leave, the request will appear for the admin in this page so he can approve it or keep it pending, also the admin can delete any leave request