Difference between revisions of "File Manager"
| Line 10: | Line 10: | ||
Folders are a very useful way of adding an organization and a structure to your account. They make the maintenance of the site much easier. You can easily list the files in every folder. Most web sites include at least an /image folder to keep all the image files separately. | Folders are a very useful way of adding an organization and a structure to your account. They make the maintenance of the site much easier. You can easily list the files in every folder. Most web sites include at least an /image folder to keep all the image files separately. | ||
| − | Step 1: | + | '''Step 1:''' |
Click on the New Folder link. | Click on the New Folder link. | ||
[[File:image16.jpg|center|frame|link=]] | [[File:image16.jpg|center|frame|link=]] | ||
| − | Step 2: Enter the name of the new folder and define the location where it will be created. | + | '''Step 2:''' Enter the name of the new folder and define the location where it will be created. |
| − | Step 3: Click on the Create New Folder button. The new folder will appear in the chosen location. | + | '''Step 3:''' Click on the Create New Folder button. The new folder will appear in the chosen location. |
== Uploading files in File Manager == | == Uploading files in File Manager == | ||
| Line 20: | Line 20: | ||
[[File:image17.jpg|center|frame|link=]] | [[File:image17.jpg|center|frame|link=]] | ||
How to upload files in File Manager: | How to upload files in File Manager: | ||
| − | Step 1: Navigate to the folder where you want to upload your files.<br/> | + | '''Step 1:''' Navigate to the folder where you want to upload your files.<br/> |
| − | Step 2: Click on the Upload icon.<br/> | + | '''Step 2:''' Click on the Upload icon.<br/> |
| − | Step 3: Click on the Browse button next to one of the top fields.<br/> | + | '''Step 3:''' Click on the Browse button next to one of the top fields.<br/> |
| − | Step 4: Search for and double-click on the first file to upload. The upload will start automatically.<br/> | + | '''Step 4:''' Search for and double-click on the first file to upload. The upload will start automatically.<br/> |
| − | Step 5: Repeat the above steps for each file you want to upload.<br/> | + | '''Step 5:''' Repeat the above steps for each file you want to upload.<br/> |
| − | Step 6: Click on the Overwrite existing files check box if you want to overwrite existing files with the same name.<br/> | + | '''Step 6:''' Click on the Overwrite existing files check box if you want to overwrite existing files with the same name.<br/> |
You can download files from the server to your personal computer through the Download option.<br/> | You can download files from the server to your personal computer through the Download option.<br/> | ||
You can copy and move files between the account's folders through the Copy and Move File functionalities. You can Rename and Delete the existing files through the corresponding options. | You can copy and move files between the account's folders through the Copy and Move File functionalities. You can Rename and Delete the existing files through the corresponding options. | ||
Revision as of 08:08, 9 September 2015
How to access the File Manager
To access the File Manager click on the corresponding icon in the Files section of your cPanel.

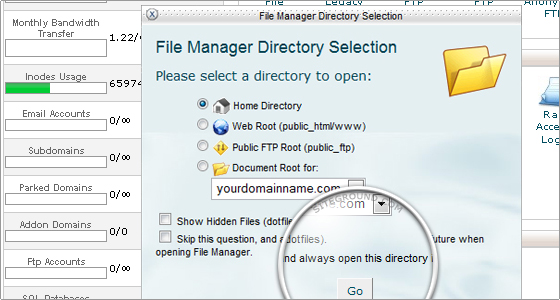
Then you will be able to pick the directory for which to open File Manager:

The File Manager appears as follows:

Creating a new folder
Folders are a very useful way of adding an organization and a structure to your account. They make the maintenance of the site much easier. You can easily list the files in every folder. Most web sites include at least an /image folder to keep all the image files separately.
Step 1: Click on the New Folder link.

Step 2: Enter the name of the new folder and define the location where it will be created. Step 3: Click on the Create New Folder button. The new folder will appear in the chosen location.
Uploading files in File Manager
You can start uploading files through File Manager by clicking on the Upload icon.

How to upload files in File Manager:
Step 1: Navigate to the folder where you want to upload your files.
Step 2: Click on the Upload icon.
Step 3: Click on the Browse button next to one of the top fields.
Step 4: Search for and double-click on the first file to upload. The upload will start automatically.
Step 5: Repeat the above steps for each file you want to upload.
Step 6: Click on the Overwrite existing files check box if you want to overwrite existing files with the same name.
You can download files from the server to your personal computer through the Download option.
You can copy and move files between the account's folders through the Copy and Move File functionalities. You can Rename and Delete the existing files through the corresponding options.