Difference between revisions of "Campaigns"
| Line 1: | Line 1: | ||
[[Category:PushMail]] | [[Category:PushMail]] | ||
| − | The | + | The Campaigns section from the left menu includes four submenus: |
== Campaigns == | == Campaigns == | ||
| − | This page displays all the campaigns | + | This page displays all the campaigns. You can filter them using the search criteria, and you can add a new campaign by clicking on the “Create New” button. |
[[File:campaign.png|center|frame|link=|Campaigns Page]] | [[File:campaign.png|center|frame|link=|Campaigns Page]] | ||
=== Create New Campaigns === | === Create New Campaigns === | ||
| − | + | Ensure that your account is set up, and that you have created/imported at least one [[Lists|List]] and one [[Templates|Template]] before creating your first campaign. | |
| − | To create a new campaign, from the campaign page | + | To create a new campaign, click on “Create New” from the campaign page. Fill in the required fields: type in a campaign name and choose which list you want to send the campaign to from the drop-down list. |
[[File:create-campaign.png|center|frame|link=|Create New Campaign]] | [[File:create-campaign.png|center|frame|link=|Create New Campaign]] | ||
| − | + | After clicking on the "Save and Next" button, the next screen is the Campaign Setup and Campaign Options for tracking and receiving stats. Click on each header title for information on each setting. | |
[[File:Campaign-setup-and-Campaign-options.png|center|frame|link=|Campaign Setup and Campaign Options]] | [[File:Campaign-setup-and-Campaign-options.png|center|frame|link=|Campaign Setup and Campaign Options]] | ||
| − | Clicking | + | Clicking "Save and Next" will take you to the template area. Here, you can create or choose a template. The Mailer Application uses CKEditor, a WYSIWYG visual template builder. Familiarize yourself with this editor in the Template area and on their website. Hovering over each button will provide an information box of its function. If you are familiar with HTML coding, you can click on the ‘Source’ button to view/modify/paste code. |
| − | The Mailer Application uses | + | |
[[File:campaign-template.png|center|frame|link=|Create or Choose a Template]] | [[File:campaign-template.png|center|frame|link=|Create or Choose a Template]] | ||
| Line 27: | Line 26: | ||
== Groups == | == Groups == | ||
| − | This page lists all the added groups | + | This page lists all the added groups. You can edit or delete any of them by clicking on the corresponding buttons. You can also add a new group by clicking on the “Create New” button and filling in the group name. |
| − | Groups | + | |
| + | Groups help categorize your campaigns. For example, if you have 40-50 or more campaigns for both Estates and Yachts, you can create Estate and Yacht groups and categorize each campaign within these groups for easier searching instead of having to search through all campaigns. | ||
[[File:campaign-groups.png|center|frame|link=|Campaign Groups]] | [[File:campaign-groups.png|center|frame|link=|Campaign Groups]] | ||
| Line 34: | Line 34: | ||
== Stats == | == Stats == | ||
| − | This page lists all the campaigns and their general stats, | + | This page lists all the campaigns and their general stats, which is useful for comparing campaigns. |
[[File:campaign-stats.png|center|frame|link=|Campaign Stats]] | [[File:campaign-stats.png|center|frame|link=|Campaign Stats]] | ||
== Custom Tags == | == Custom Tags == | ||
| − | You can create custom tags | + | You can create custom tags to be used inside campaigns. You can also edit or delete any of the added tags. |
[[File:campaign-tags.png|center|frame|link=|Campaign Custom Tags]] | [[File:campaign-tags.png|center|frame|link=|Campaign Custom Tags]] | ||
Latest revision as of 08:00, 23 July 2024
The Campaigns section from the left menu includes four submenus:
Campaigns
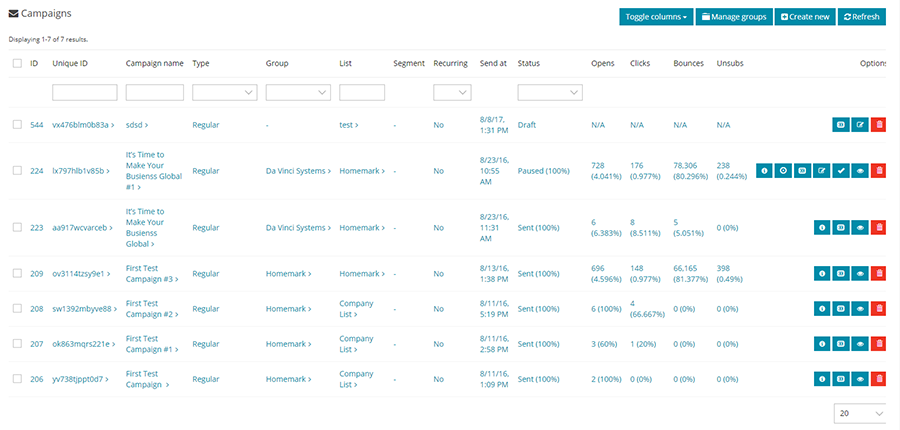
This page displays all the campaigns. You can filter them using the search criteria, and you can add a new campaign by clicking on the “Create New” button.
Create New Campaigns
Ensure that your account is set up, and that you have created/imported at least one List and one Template before creating your first campaign.
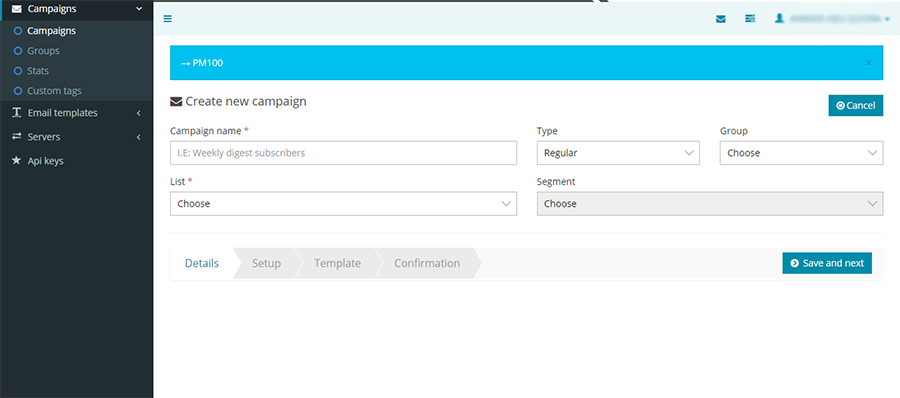
To create a new campaign, click on “Create New” from the campaign page. Fill in the required fields: type in a campaign name and choose which list you want to send the campaign to from the drop-down list.
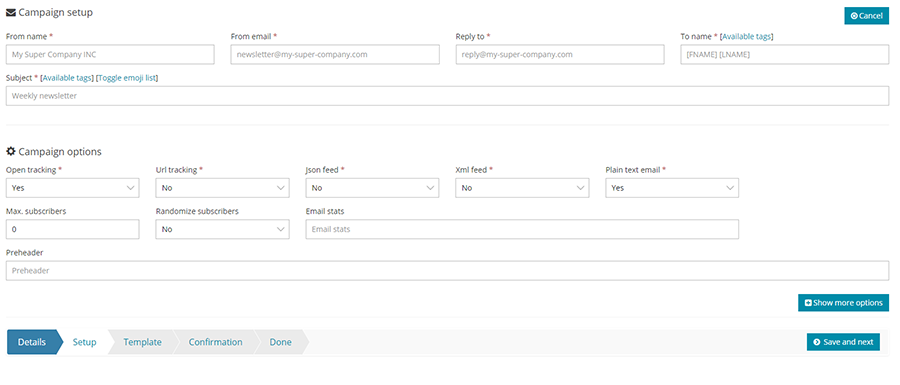
After clicking on the "Save and Next" button, the next screen is the Campaign Setup and Campaign Options for tracking and receiving stats. Click on each header title for information on each setting.
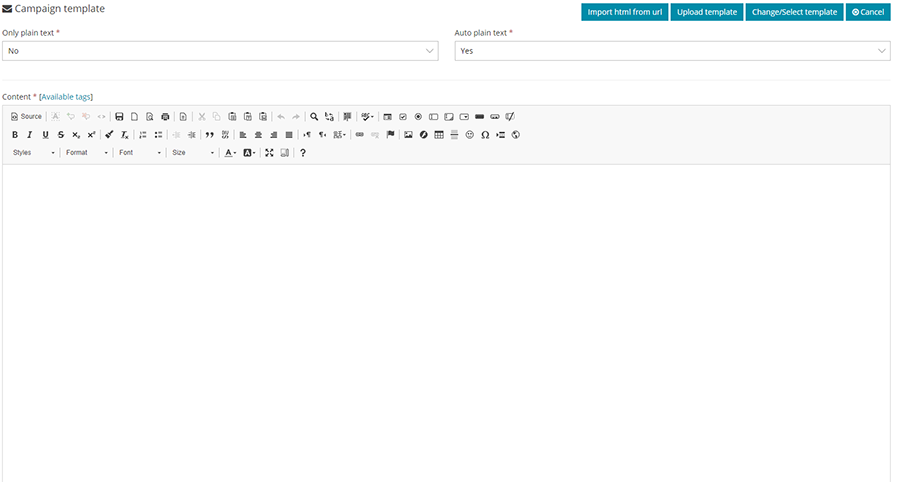
Clicking "Save and Next" will take you to the template area. Here, you can create or choose a template. The Mailer Application uses CKEditor, a WYSIWYG visual template builder. Familiarize yourself with this editor in the Template area and on their website. Hovering over each button will provide an information box of its function. If you are familiar with HTML coding, you can click on the ‘Source’ button to view/modify/paste code.
Groups
This page lists all the added groups. You can edit or delete any of them by clicking on the corresponding buttons. You can also add a new group by clicking on the “Create New” button and filling in the group name.
Groups help categorize your campaigns. For example, if you have 40-50 or more campaigns for both Estates and Yachts, you can create Estate and Yacht groups and categorize each campaign within these groups for easier searching instead of having to search through all campaigns.

Stats
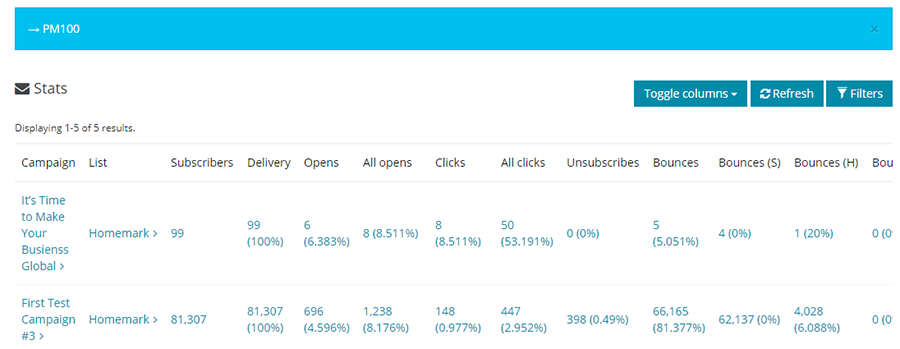
This page lists all the campaigns and their general stats, which is useful for comparing campaigns.
Custom Tags
You can create custom tags to be used inside campaigns. You can also edit or delete any of the added tags.
