Difference between revisions of "Create FTP Account"
From SNIPER Systems
| Line 1: | Line 1: | ||
| − | == | + | == Creating an FTP Account == |
| − | + | Step 1: Login to cPanel | |
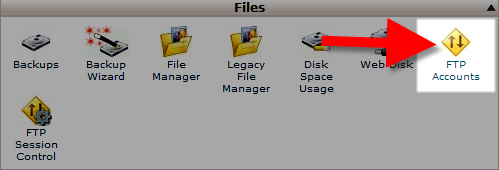
| − | [[File: | + | Step 2: Click the FTP Accounts button in the Files section. |
| − | + | [[File:ftp-accounts-button-cpanel.png|center|frame|link=]] | |
| − | + | Step 3: In the Add FTP Account section, fill in the fields as needed. Below is a brief description of the options. | |
| − | + | <table class="article_table"> | |
| − | + | <tbody> | |
| + | <tr> | ||
| + | <th>Option</th> | ||
| + | <th>Description</th> | ||
| + | </tr> | ||
| − | + | <tr> | |
| − | + | <td><strong>Login:</strong></td> | |
| + | <td>Enter the username you want to use; it will be combined with your primary domain name to create the full username. For example, if you enter <strong>joeuser</strong> in this field, the <em>FTP Username</em> will be: <strong>joeuser@example.com</strong></td> | ||
| + | </tr> | ||
| − | + | <tr> | |
| − | + | <td><strong>Password:</strong></td> | |
| − | + | <td>Enter a strong password in this field. Need help creating a secure password? Use the <strong>Password Generator</strong> button</td> | |
| − | + | </tr> | |
| − | + | ||
| − | + | <tr> | |
| − | + | <td><strong>Password (Again):</strong></td> | |
| − | + | <td>Enter the same password here, to confirm the spelling.</td> | |
| − | + | </tr> | |
| − | + | ||
| − | + | ||
| − | + | ||
| − | + | ||
| − | + | ||
| − | + | ||
| − | + | <tr> | |
| + | <td><strong>Strength:</strong></td> | ||
| + | <td>This field tells you how secure your password is. Strength levels range from <strong>Very Weak</strong> to <strong>Very Strong</strong></td> | ||
| + | </tr> | ||
| − | + | <tr> | |
| + | <td><strong>Directory:</strong></td> | ||
| + | <td>When you create an FTP account, it is limited to the directory you set here. To give them full access to your file system, just enter a <strong>forward slash</strong>, like this: <strong>/</strong> | ||
| + | <p class="alert alert-info">To give limited access to your website files to an FTP account, enter <strong>public_html</strong>. Or as you name the FTP account it will try to automatically restrict access to <strong>public_html/username</strong></p> | ||
| + | </td> | ||
| + | </tr> | ||
| + | |||
| + | <tr> | ||
| + | <td><strong>Quota:</strong></td> | ||
| + | <td>You can limit the amount of space an FTP user can use here, or set them to <strong>Unlimited</strong>.</td> | ||
| + | </tr> | ||
| + | </tbody> | ||
| + | </table> | ||
| + | |||
| + | Step 4: Click the Create FTP Account button. You will then see a message stating "Account Created" | ||
Revision as of 08:02, 9 September 2015
Creating an FTP Account
Step 1: Login to cPanel Step 2: Click the FTP Accounts button in the Files section.
Step 3: In the Add FTP Account section, fill in the fields as needed. Below is a brief description of the options.
| Option | Description |
|---|---|
| Login: | Enter the username you want to use; it will be combined with your primary domain name to create the full username. For example, if you enter joeuser in this field, the FTP Username will be: [email protected] |
| Password: | Enter a strong password in this field. Need help creating a secure password? Use the Password Generator button |
| Password (Again): | Enter the same password here, to confirm the spelling. |
| Strength: | This field tells you how secure your password is. Strength levels range from Very Weak to Very Strong |
| Directory: | When you create an FTP account, it is limited to the directory you set here. To give them full access to your file system, just enter a forward slash, like this: /
To give limited access to your website files to an FTP account, enter public_html. Or as you name the FTP account it will try to automatically restrict access to public_html/username |
| Quota: | You can limit the amount of space an FTP user can use here, or set them to Unlimited. |
Step 4: Click the Create FTP Account button. You will then see a message stating "Account Created"